How to Set Up SSL Certificates on Plesk for Whole Domains
Securing your website with SSL is essential for both trust and performance. In this guide, I’ll walk you through the step-by-step process to set up SSL certificates on Plesk for your entire domain, ensuring that all pages are served over HTTPS. Whether you’re looking to secure your primary domain or add encryption for subdomains, this tutorial covers the essential steps.
In this guide I will cover both, using a free certificate from Let’s Encrypt and Installing a purchased SSL Certificate.
Why SSL Matters
SSL (Secure Sockets Layer) certificates encrypt the data exchanged between your visitors and your website, protecting sensitive information and boosting your site’s search engine ranking. With browsers increasingly flagging non-HTTPS sites as “Not Secure,” it’s more important than ever to switch to an encrypted connection.
Step-by-Step Guide:
Setting Up SSL Certificates in Plesk
Prerequisites
Before getting started, make sure you have:
- Access to Plesk: Administrator or reseller privileges to manage your domains.
- A registered domain name: Ensure it points to your Plesk server.
- An SSL certificate: You can obtain a free certificate via Let’s Encrypt, purchase one from a Certificate Authority, or create a self-signed certificate for testing.
1. Log into Your Plesk Panel
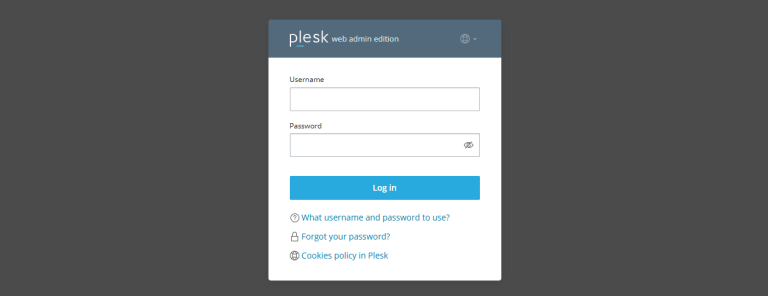
- Open your browser and navigate to your Plesk login page.
- Enter your credentials and log in.
2. Navigate to Your Domain Settings
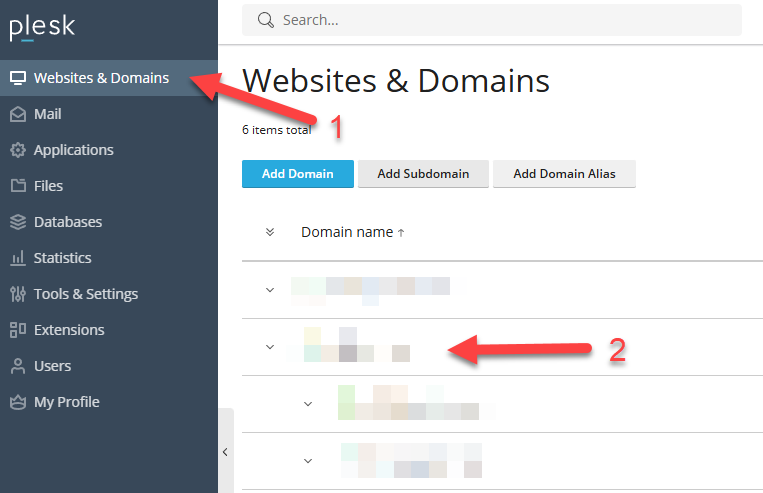
- In the left sidebar, click on Websites & Domains.
- Find the domain you want to secure and click on its name to open its management panel.
3. Access the SSL/TLS Certificates Section
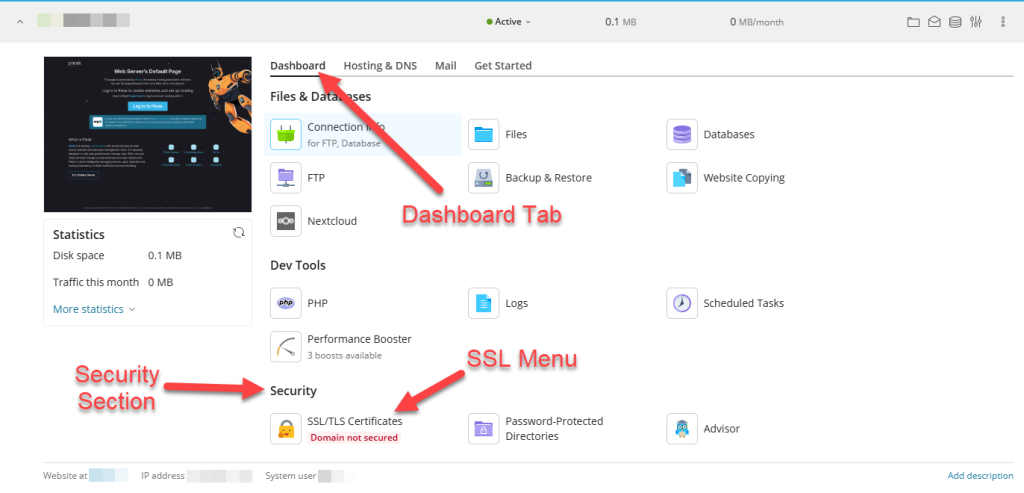
- Within your domain’s management area, locate the Dashboard Tab, click on SSL/TLS Certificates or simply SSL/TLS (depending on your Plesk version), in the Security section.
4. Choose Your SSL Certificate Method
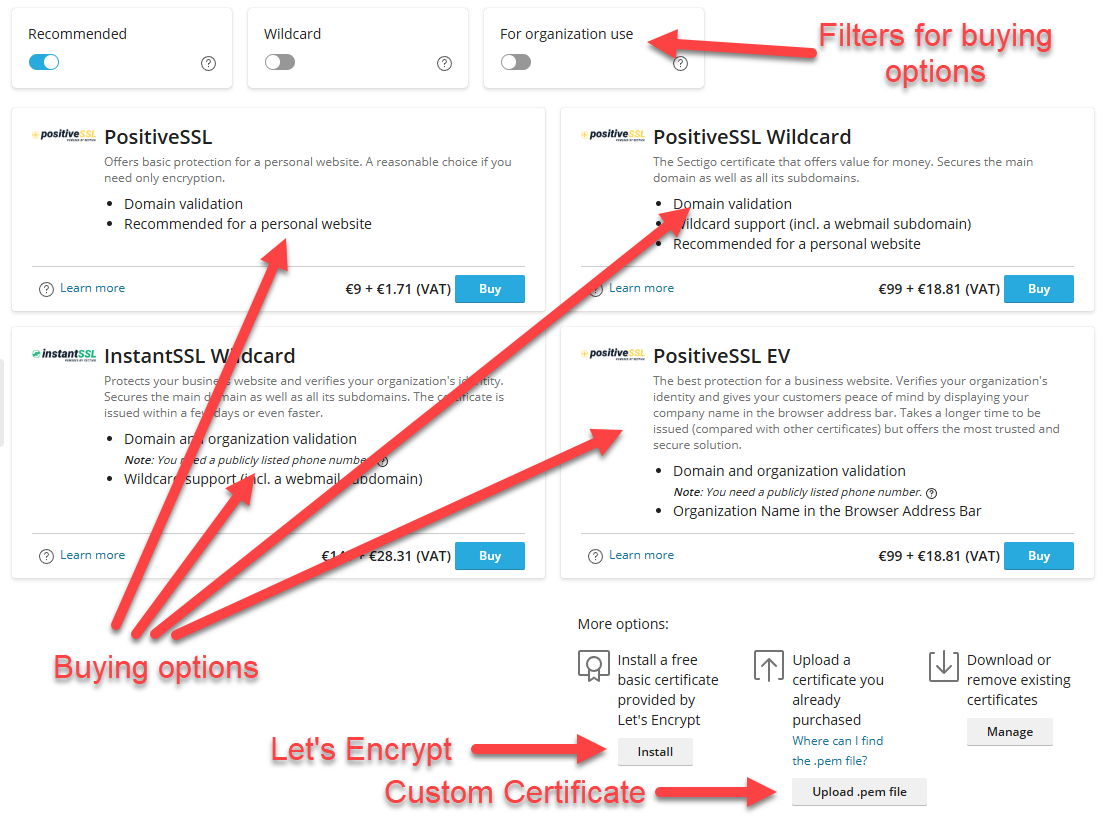
Plesk comes with the option, that you can purchase SSL certificates directly within PLESK. However, as there is the Free alternative, I would not recommend buying one of these, unless you need a Extended Validation Certifcate.
Directly below all these buying options you will find the options for Let’s Encrypt and Custom SSL Certifcates.
Option A: Using Let’s Encrypt (Free SSL)
Let’s Encrypt is a popular choice due to its simplicity and zero cost.
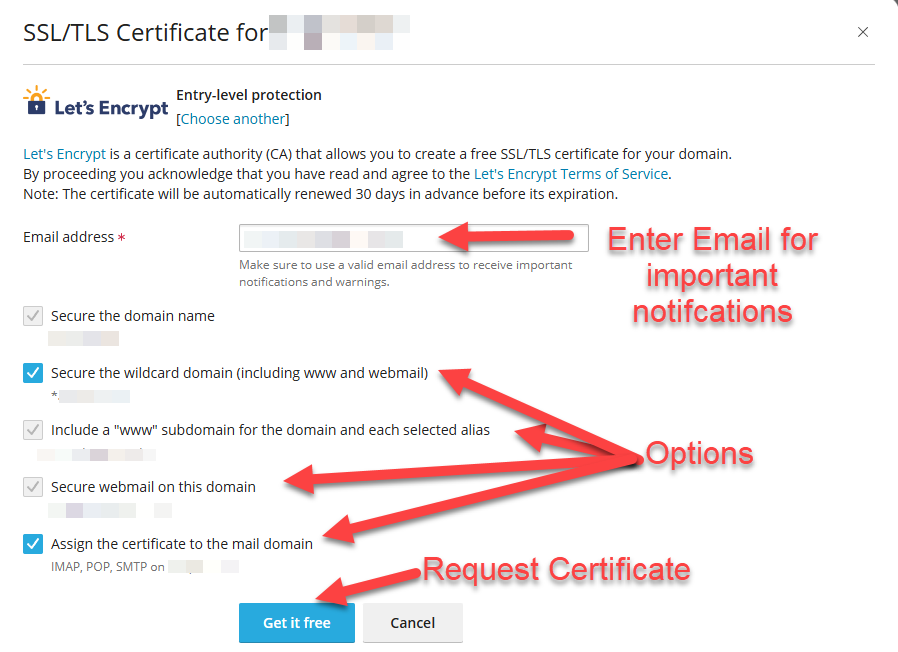
- Click on the Install Button in the Let’s Encrypt section, under More options.
- In the Let’s Encrypt setup window:
- Enter an Email, to receive administrative information for your certifcate (Expiry Notifications, etc.)
- Ensure that both the Secure the domain and Include www subdomain options are checked if you want to cover both versions.
- If you need to secure additional subdomains or services, check the appropriate boxes.
- Click Install or Get it free
Skip this Step when you are using Plesk to manage your DNS records!
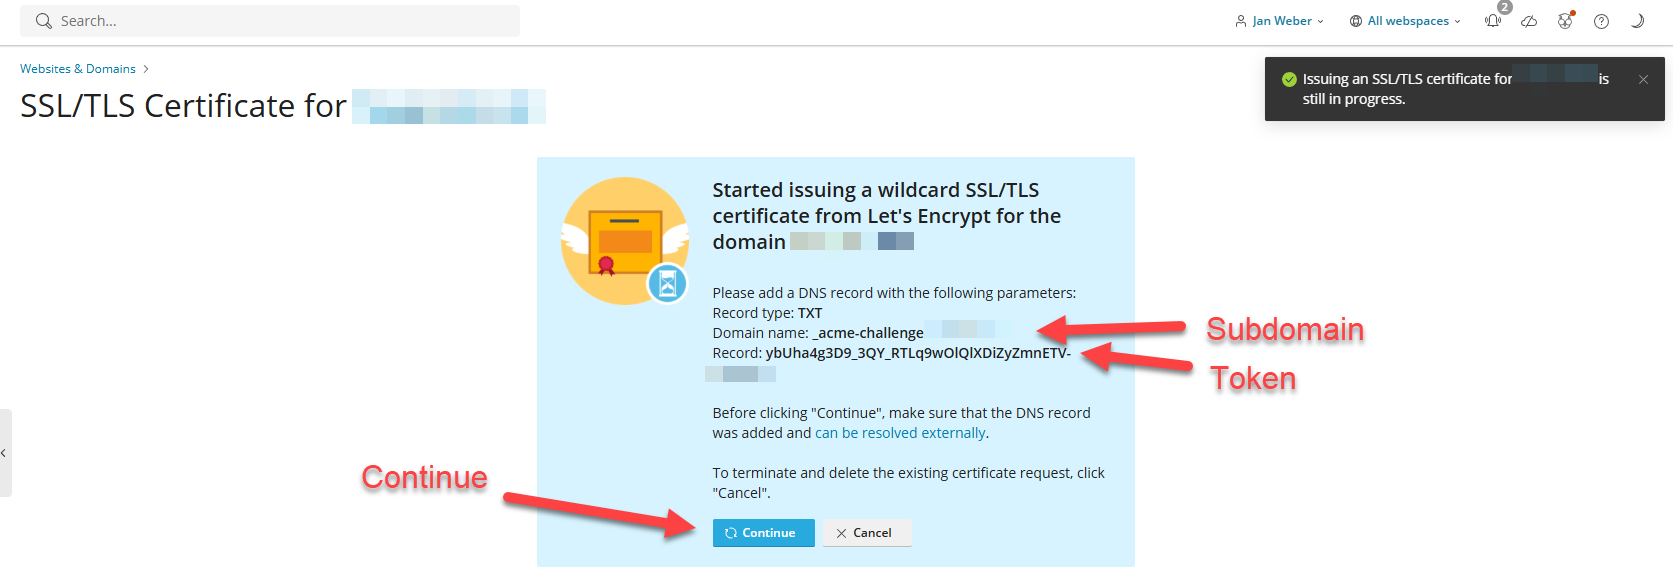
When you are managing your DNS with an external provider Let’s Encrypt needs to verify, that you are the owner of the domain and, therefore will ask you to create an ACME Record on a specific subdomain.
- Go to your DNS Provider and create the Subdomain requested by Let’s Encrypt
- Create a TXT Record for this specific Subdomain and paste the value provided in Plesk
- Check if the TXT Entry can be resolved externally before clicking on Continue in Plesk
- Using your command prompt in windows, you can type the following command, to check if the TXT entry can be resolved.
nslookup -q="TXT" _acme-challenge.med-tec.me
- If you receive a response, which contains the exact same token, you can proceed by clicking Continue in your Plesk window.
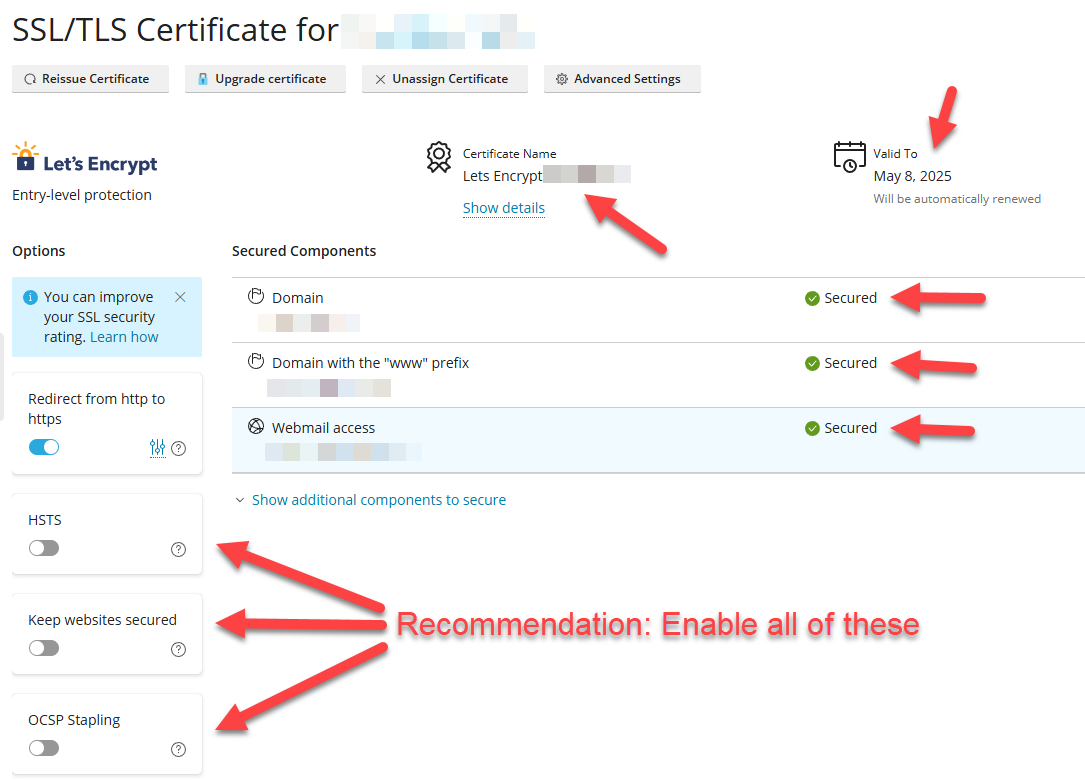
Congratulations! You did it, your Website is now secured. To add an extra Layer of Security, I would recommend to enable all Options on the left hand.
Additionally, check Step 5 of this guide to force all website traffic to use HTTPS.
Option B: Installing a Purchased or Custom SSL Certificate
If you have purchased an SSL certificate or want to use your own:
- Click on Upload .pem file.
- Enter a name for your certificate (e.g., “MyDomain SSL”).
- Upload the certificate files:
- Certificate file (usually ends in
.crtor.pem) - Private key file
- CA bundle (if provided by your Certificate Authority)
- Certificate file (usually ends in
- Click Upload Certificate.
- After the certificate is uploaded, return to the domain’s settings and select Secure the domain by choosing your newly uploaded certificate.
5. Force HTTPS (Optional but Recommended)
To ensure that all traffic to your domain uses HTTPS:
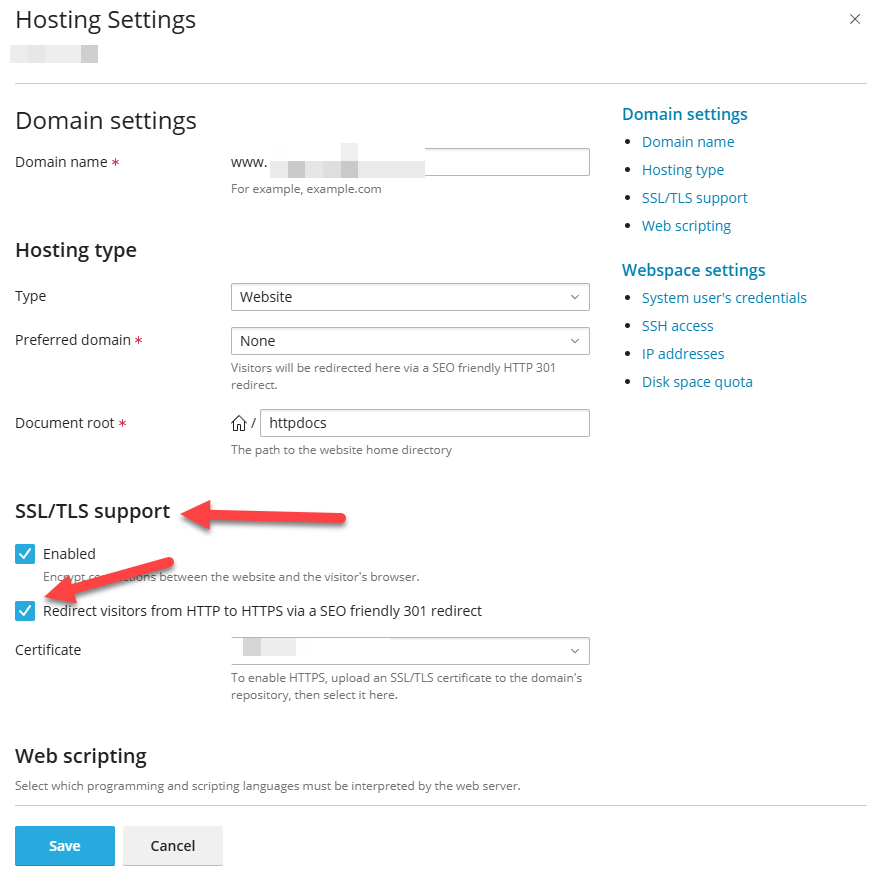
- Go back to the Websites & Domains tab.
- Click on Hosting Settings for your domain.
- Check the box labeled Permanent SEO-safe 301 redirect from HTTP to HTTPS.
- Save your changes.
This setting ensures that visitors accessing your website via HTTP are automatically redirected to the secure HTTPS version.
Final thoughts
Setting up SSL certificates on Plesk is straightforward once you understand the process. Whether you choose a free option like Let’s Encrypt or a paid certificate, securing your entire domain improves trust, protects your visitors, and enhances your site’s SEO. By following the steps above, you can ensure your website is well-protected and ready for a secure future.
Feel free to share your experiences or ask questions in the comments below. Happy securing!
I hope you found this guide helpful. For more tutorials on website security and web hosting, stay tuned to med-tec.me!


