Step-by-Step: Running GitLab on Plesk
In today’s fast-paced development environment, a reliable and self-hosted version control system is essential. Whether you’re managing a small project or coordinating a large development team, GitLab Community Edition (CE) is a powerful alternative to cloud-based platforms like GitHub. But what if you’re already using Plesk for web hosting? Can GitLab be seamlessly integrated into your existing setup? The answer is yes!
Unlike GitHub, which stores your repositories on external servers, GitLab CE allows full control over your data. This self-hosted approach is particularly valuable for businesses, enterprises, and developers who prioritize privacy, security, and compliance. By hosting GitLab on a Plesk-managed server, you get the best of both worlds: a centralized, private Git repository while leveraging Plesk’s user-friendly web interface.
What you will learn in this Guide
In this tutorial, I’ll walk you through every step of installing and configuring GitLab CE on a Plesk-managed server. However, since Plesk’s default setup differs from a standard GitLab installation, we will adjust certain configurations to ensure compatibility.
Key topics covered include:
✔️ Installing GitLab CE while avoiding conflicts with Plesk’s existing services.
✔️ Configuring Nginx as a reverse proxy to route traffic properly.
✔️ Setting up an SSL certificate for secure GitLab access.
✔️ Integrating GitLab with Plesk’s mail services for notifications.
Why should I host Gitlab in Plesk?
Prerequisites
- Server with Plesk installed (I tested this with Obsidian 18.0.67)
- SSH access to your Server, including permissions to install Software
- Domain with suitable DNS Management Tools (Adding Subdomain)
- ~ 1 hour Time
1. Access Plesk Interface and create a Webspace
Before installing GitLab CE, you need to prepare your Plesk environment. Begin by logging into your Plesk control panel.
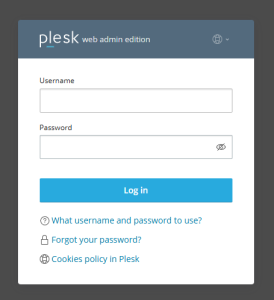
1.1 Log in to your plesk interface
Open your web browser and navigate to your Plesk login page. Enter your username and password to access the dashboard.
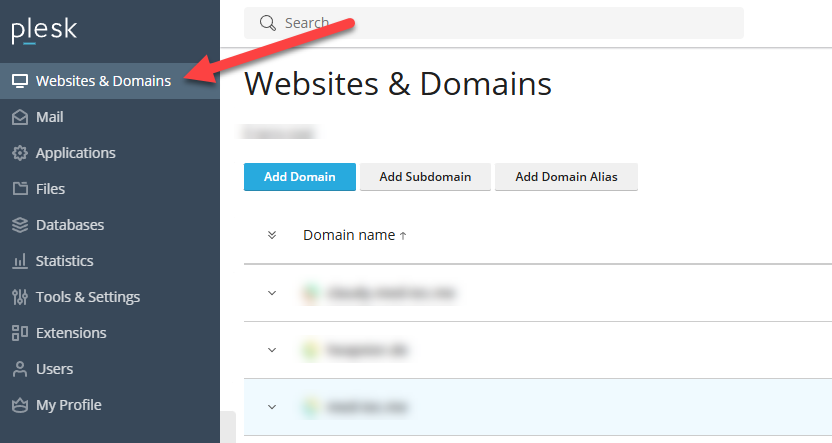
1.2 Go to Website & Domains
Once logged in, locate the Websites & Domains tab on the left-hand side of the dashboard. This is where you’ll manage your domains and subdomains.
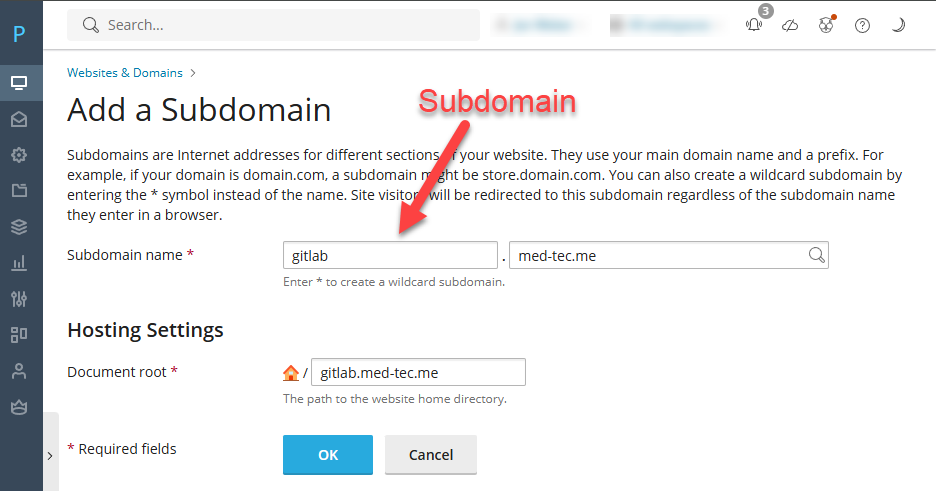
1.3 Add a New Domain or Subdomain
In the Websites & Domains section, click on the option to Add Domain or Add Subdomain.
- If you want GitLab to run on its own domain, choose Add Domain.
- If you prefer to run it as a subdomain (e.g., gitlab.med-tec.me), choose Add Subdomain.
- Follow the on-screen prompts to configure the domain or subdomain. This step is essential to ensure that GitLab CE has a dedicated web address on your server.
1.4 Get an SSL Certificate for your webserver
In addition to setting up a dedicated domain, securing your GitLab instance with HTTPS is crucial for protecting data and ensuring secure communications between your server and its users (including YOU!). In this step, you’ll obtain and install an SSL certificate for your webserver. For detailed instructions on how to set up SSL certificates, check out my comprehensive tutorial on installing SSL Certificates in another post.
Quick Guide on how to install SSL in PLESK
2. Install GitLab
GitLab provides a well-documented installation guide, which you can find at GitLab’s official installation page. However, since we are setting up GitLab in a Plesk-managed environment with existing mail services and a reverse proxy configuration, some adjustments are necessary compared to the standard installation.
This guide will walk you through the installation process while ensuring compatibility with Plesk’s existing infrastructure. If you’re using a different operating system than Ubuntu, you can still refer to the official GitLab documentation for OS-specific installation instructions.
2.1 Install GitLab Prerequisites
Before installing GitLab, we need to ensure that all required dependencies are present on the system. Typically, GitLab recommends installing Postfix as part of the setup to handle outgoing emails. However, since Plesk already includes Postfix as part of its mail server configuration, we will skip this step to prevent conflicts.
Run the following commands to update your package list and install the necessary dependencies:
					sudo apt-get update
sudo apt-get install -y curl openssh-server ca-certificates tzdata perl
2.2 Install GitLab Repository
Now that we have installed the necessary prerequisites, the next step is to add the official GitLab package repository to our system. This ensures that we can install and update GitLab easily using the system’s package manager.
Run the repository script (Community Edition)
To automatically configure the GitLab package repository, execute the following command:
curl https://packages.gitlab.com/install/repositories/gitlab/gitlab-ce/script.deb.sh | sudo bash
Run the repository script (Enterprise Edition)
If you want to use the Enterprise Edition on your system you need to run the following script, instead of the above mentioned:
curl https://packages.gitlab.com/install/repositories/gitlab/gitlab-ee/script.deb.sh | sudo bash
2.3 Install GitLab CE or EE
With the repository successfully added, we are now ready to install GitLab on our server. The installation process will download and configure GitLab with the necessary components.
Make sure to always use http:// in the EXTERNAL_URL Paramter, as we do not want Gitlab to request a certificate from Let’s Encrypt. We want Plesk to handle those things.
Run the installation command (Gitlab CE)
Execute the following command to install the Community Edition. Keep in mind you may need to change the URL and Port for your specific setup.
sudo EXTERNAL_URL="http://gitlab.med-tec.me:8929" apt-get install gitlab-ce
Run the installation command (Gitlab EE)
Execute the following command to install the Enterprise Edition. Keep in mind you may need to change the URL and Port for your specific setup.
sudo EXTERNAL_URL="http://gitlab.med-tec.me:8929" apt-get install gitlab-ee
2.3 Start GitLab
Theoretically, you now should be able to start gitlab using the following command:
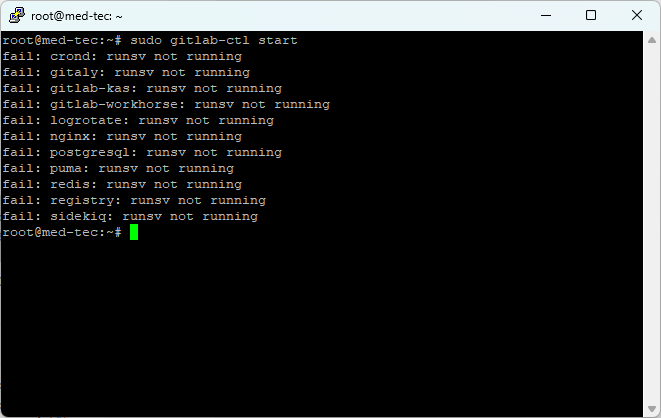
sudo gitlab-ctl start
However, in my case I receive an error doing so. The Error looks the following:
If you are facing the same error, the activation of the service fixed it for me:
systemctl enable gitlab-runsvdir && systemctl start gitlab-runsvdir && sudo gitlab-ctl reconfigure
3. Configure The Webserver
By default, Plesk’s web server (Apache or Nginx) is configured to serve websites directly. However, when hosting your own GitLab instance, we need to change this configuration to proxy mode so that Plesk forwards incoming web requests to GitLab, which runs on a different internal port (e.g., http://localhost:8929).
In the whole tutoial I will use port 8929, feel free to adjust according to your needs.
We need to do this, as Plesk is already using the standard Web-Ports (80, 443) and we want Plesk to handle the Website (SSL renewal and other administrative things).
3.1 Naviagte to Apache Configuration
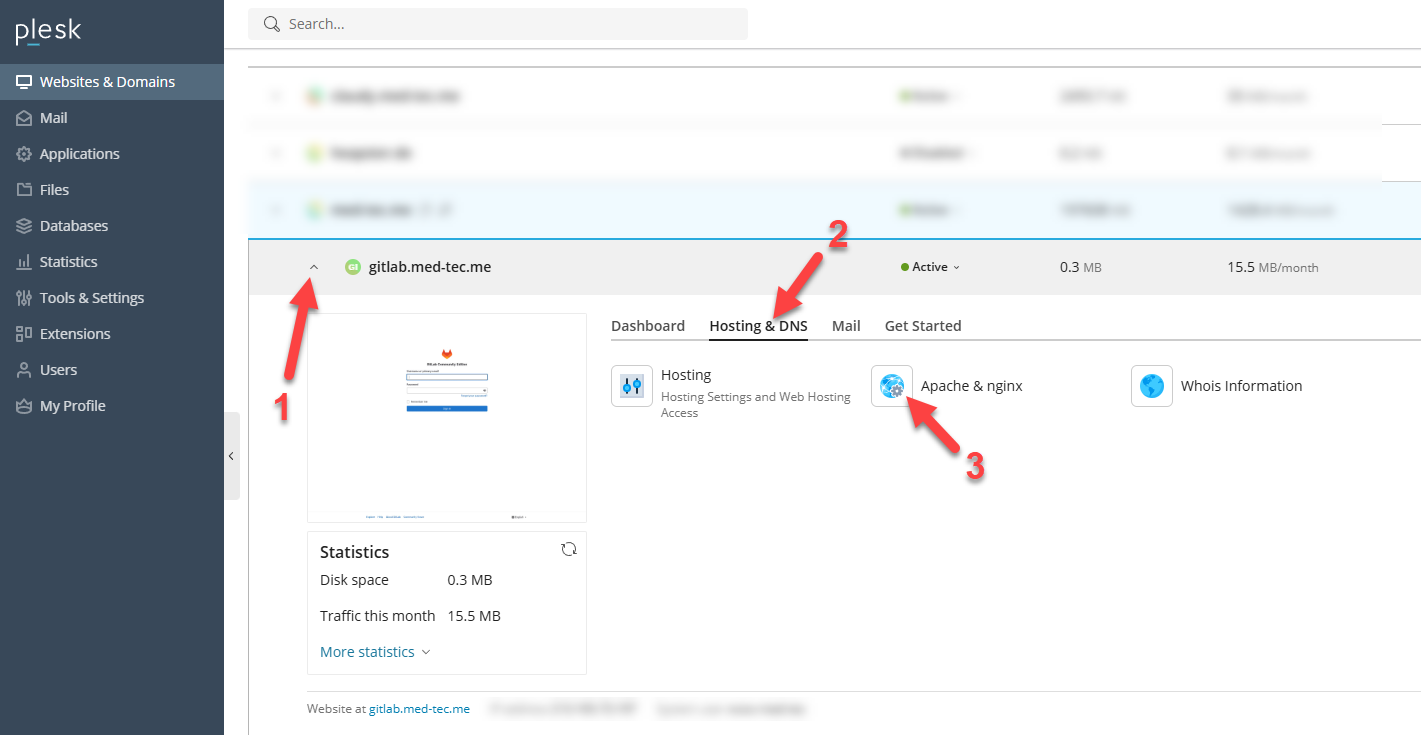
In order to change the configuration you need to navigate to your in Step 1.3 created Webspace. Then Switch to the Tab Hosting & DNS and click the Menu Entry Apache & nginx.
3.2 Create a folder for Gitlab Logs
As we are going to create a custom Logfile Location for the Apache Gitlab Logs, you may need to create the filelocation for the logfiles first. Else you may run into the following error:
To fix this, run the following command in the terminal of your machine:
mkdir /var/log/apache2/gitlab
3.3 Change Apache Configuration (additional directives)
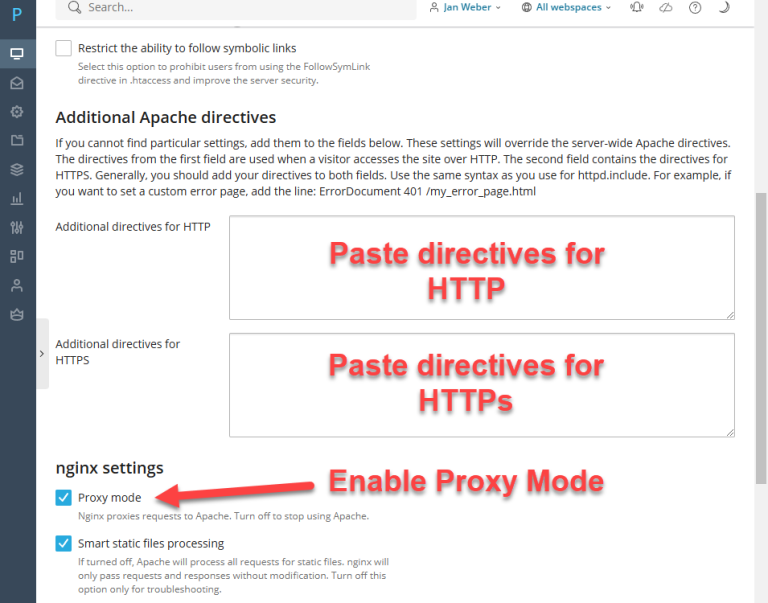
Below the screenshot, you will find code blocks that need to be added to the respective fields in the Plesk configuration. The screenshot includes annotations indicating where to paste each directive for HTTP and HTTPS settings. Additionally, ensure that the Proxy mode option is enabled for proper request forwarding.
Keep in mind that the port used in the directives may need to be adjusted based on your GitLab setup. If GitLab is running on a different port than the one I am using (8929), update the configuration accordingly to match your specific environment.
Additional directives for HTTP
					RewriteEngine On
RewriteCond %{HTTPS} !=on
RewriteCond %{REQUEST_URI} !^/.well-known/.*
RewriteRule  ^/(.*)  https://%{HTTP_HOST}/$1  [last,redirect=301]
					# Disable forward proxying
ProxyRequests Off

# Preserve the original host
ProxyPreserveHost On

# Enable SSL proxy support
SSLProxyEngine on

# Increase timeout for Git operations
ProxyTimeout 300

# Proxy settings to forward traffic to GitLab
ProxyPass / http://127.0.0.1:8929/ nocanon
ProxyPassReverse / http://127.0.0.1:8929/

# Allow encoded slashes (GitLab requires this)
AllowEncodedSlashes NoDecode

# Reverse Proxy Location Block
<Location />
	ProxyPassReverse /
	Require all granted
</Location>

# Rewrite rules to ensure proper file handling
RewriteEngine on

# Bypass Apache for uploads and existing files
RewriteCond %{DOCUMENT_ROOT}/%{REQUEST_FILENAME} !-f [OR]
RewriteCond %{REQUEST_URI} ^/uploads/.*
RewriteRule .* http://127.0.0.1:8929%{REQUEST_URI} [P,QSA,NE,L]

# Preserve HTTPS headers for GitLab
RequestHeader set X-Forwarded-Proto 'https'
RequestHeader set X-Forwarded-Ssl on
RequestHeader set X-Forwarded-For %{REMOTE_ADDR}s

# Security enhancements
Header always set X-Frame-Options DENY
Header always set X-Content-Type-Options nosniff
Header always set Strict-Transport-Security "max-age=31536000; includeSubDomains; preload"

# Protect Apache status page (if enabled)
<Location /server-status>
	Require ip 127.0.0.1
</Location>

# Document root (must match GitLab's public directory)
DocumentRoot /opt/gitlab/embedded/service/gitlab-rails/public

# Custom error pages
ErrorDocument 404 /404.html
ErrorDocument 422 /422.html
ErrorDocument 500 /500.html
ErrorDocument 502 /502.html
ErrorDocument 503 /503.html

# Logging configuration
LogLevel warn

# Preserve real client IP in logs
LogFormat "%{X-Forwarded-For}i %l %u %t \"%r\" %>s %b \"%{Referer}i\" \"%{User-Agent}i\"" custom_forwarded

ErrorLog /var/log/apache2/gitlab/gitlab_error.log
CustomLog /var/log/apache2/gitlab/gitlab_forwarded.log custom_forwarded
CustomLog /var/log/apache2/gitlab/gitlab_access.log combined env=!dontlog
CustomLog /var/log/apache2/gitlab/gitlab.log combined
4. Final adjustments in the GitLab Config
Even though GitLab is already working like this, I recommend to make the following changes in order to make your installation more secure and more usable. If you browse for your URL you should already able to see the login screen of your gitlab instance.
The default user is root and the initial password can be found out, with the following command:
tail /etc/gitlab/initial_root_password
4.1 (optional) Change external URL
Since we have configured the external URL with a specific port, our GitLab instance is unaware that it is operating behind a reverse proxy. To ensure proper functionality, we need to update the following configuration lines in the GitLab settings.
Run the following command to access the Gitlab Config:
nano /etc/gitlab/gitlab.rb
Change the external_url by removing the port behind the URL.
					# Remove the port from the configuration
# external_url "http://gitlab.med-tec.me:8929"
external_url "http://gitlab.med-tec.me"
Uncomment and disbale the letsencrypt integration. As Plesk is handling Let’s encrypt for us.
					# Uncomment and disable Let's Encrypt
# letsencrypt['enable'] = nil
letsencrypt['enable'] = false
Assign the internal port to our bundled nginx.
					# Uncomment and set nginx listen_port
# nginx['listen_port'] = 80
nginx['listen_port'] = 8929
Save your changes and run the gitlab reconfigure command to apply all your changes.
sudo gitlab-ctl reconfigure
4.2 (Optional) Configure Gitlab SMTP / Mail Service
To ensure that GitLab can send emails – such as password reset links, notifications, and account confirmations – we need to properly configure the SMTP (Simple Mail Transfer Protocol) settings. Since we are running GitLab on a Plesk-managed server, we will use the existing mail service instead of installing a separate mail server.
Before you start with this step, generate an email account in Plesk.
Now we need to change another thing in the Gitlab Configuration:
nano /etc/gitlab/gitlab.rb
Uncomment the SMTP Settings you need and configure the Mailservice. For my specific configuration it looks like this:
					### GitLab email server settings
gitlab_rails['smtp_enable'] = true
gitlab_rails['smtp_address'] = "mx.med-tec.me"
gitlab_rails['smtp_port'] = 587
gitlab_rails['smtp_user_name'] = "gitlab@med-tec.me"
gitlab_rails['smtp_password'] = #hidden
gitlab_rails['smtp_domain'] = "med-tec.me"
gitlab_rails['smtp_authentication'] = "login"
gitlab_rails['smtp_enable_starttls_auto'] = true
gitlab_rails['smtp_tls'] = false

### Email Settings
gitlab_rails['gitlab_email_enabled'] = true
gitlab_rails['gitlab_email_from'] = 'gitlab@med-tec.me'
gitlab_rails['gitlab_email_display_name'] = 'GitLab | Gitlab.Med-Tec.me'
Save your changes and run the gitlab reconfigure command to apply all your changes.
sudo gitlab-ctl reconfigure
To Test your configuration you can go into the Gitlab console (It may takes some time to boot up):
sudo gitlab-rails console
Use the following command in the console to send a testmail:
Notify.test_email('yourmail@.de', 'Message Subject', 'Message Body').deliver_now
If your configuration works well, you should receive an Email from your GitLab instance.
You can exit the Gitlab-Rails console by typing the command exit.
Successfully running Gitlab Instance
Setting up GitLab Community Edition (CE) on a Plesk-managed server comes with unique challenges, but by carefully following this guide, you now have a fully functional self-hosted GitLab instance running behind a reverse proxy with proper SSL security and integrated mail services.
We covered:
✅ Installing GitLab CE while ensuring compatibility with Plesk’s existing services.
✅ Configuring proxy mode to route traffic correctly.
✅ Setting up SSL encryption for secure access.
✅ Adjusting SMTP settings to allow GitLab to send notifications.
By hosting GitLab CE on your own server, you gain full control over your repositories, data privacy, and security, unlike cloud-based alternatives like GitHub. This setup allows for seamless integration with existing infrastructure while keeping everything under your management.


